Lost the manual – I had for years, then I found it!
Category Archives: Pure Tech
How the hell do you do….. Hmmm that’s useful
Accessing another cloudflare server from yours: Does it go via Cloudflare network?
Hi,
I want to deploy a server which calls an API which uses Cloudflare.
If I sign my server up to use Cloudflare and configure it up.
when my server calls the other Cloudflare server’s API will the IP transit go over the Cloudflare network and be nice and fast to and fro mine?
Cheers Mark
Creating Neo public and private keys OFFLINE Part 2 of 2
Offline – going secure
Creating a batch of public and private NEO keys OFFLINE
Devote an old laptop to this particular task until they provide the functionality in the NEO-CLI to allow Neon Wallet to behave like Bitcoin’s Electrum offline facilies.
You could do the following.
- Take a fresh Ubuntu 16.04 disto and install on laptop + simple printer (new printers may have residual printer memory…)
- Install Electrum follow instructions in part 1
- Follow my instructions for generating bitcoin electrum 12 word passphrase in part 1
You then end up with a whole collection of PRIVATE KEYS which you can use paste into the Neon Paper Wallet generator
4. Download Neon Wallet by CoZ We can use this to optionally double check the NEO public keys generated by Snowpowers Paper Wallet code. EG
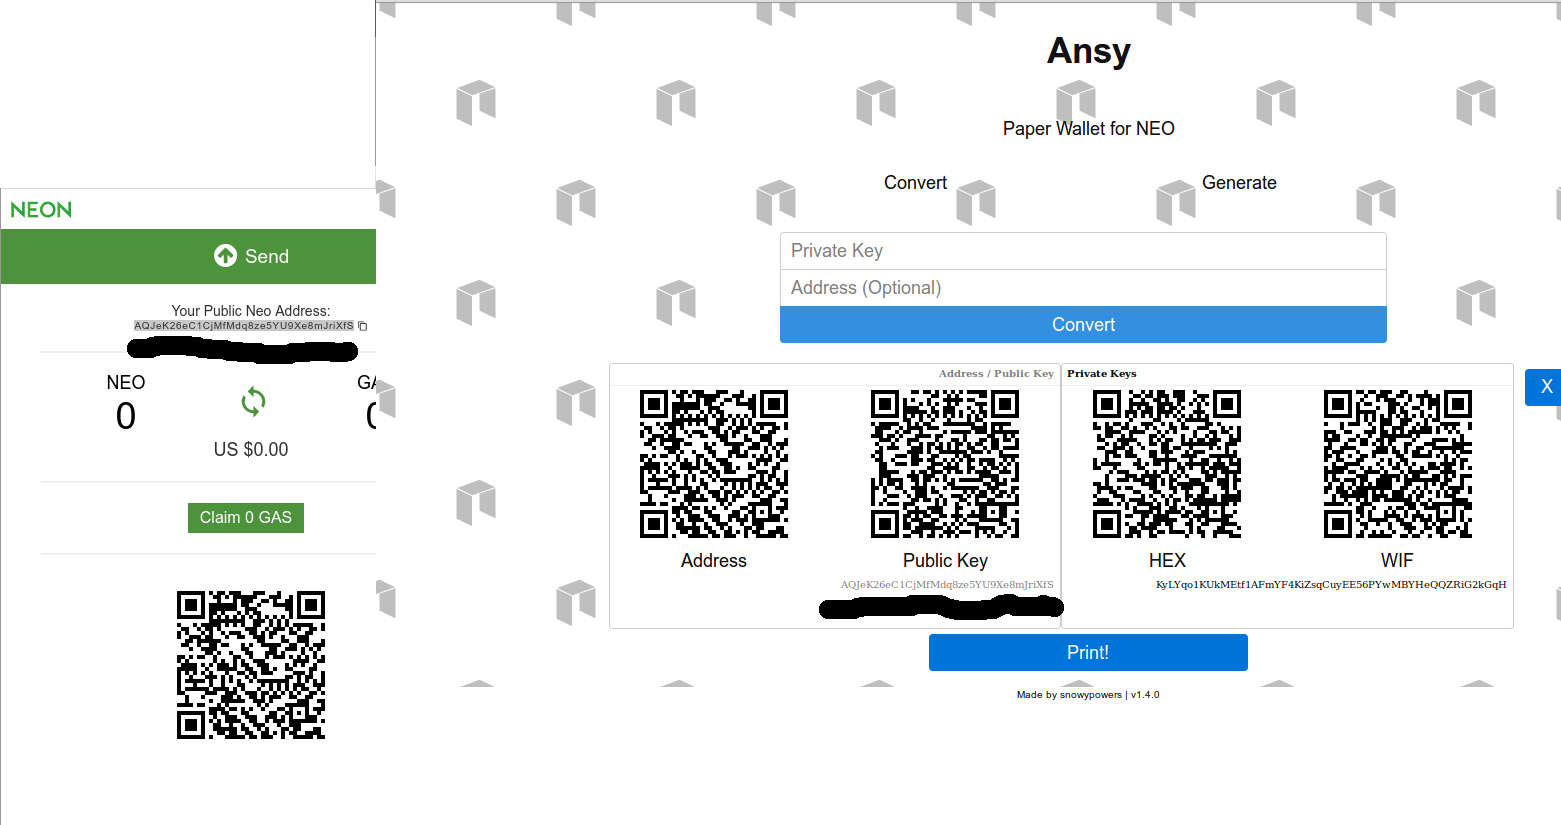
5. Go to the current Neo Paper Wallet site
https://snowypowers.github.io/ansy/
6. Disconnect the laptop
7. Use the private keys you generated in Electrum and paste them into the Neo Paper Wallet page which is now offline.
You generate the Neo PUBLIC keys by pasting in the PRIVATE bitcoin electrum generated keys and clicking on “Convert” – this allows you to create Neo PUBLIC keys from Electrum’s PRIVATE KEYS, which are now completely regenerative them from just a 12/13 word passphrase.
- Create a whole load & PRINT THEM, write down the 12 or 13 word passphrase
- Vapourise that laptop so it cannot contain any residual private keys
- Now you have a whole collection of Neo public and private keys which have been generated offline with your own dice rolls
So you can now send Neo from an exchange to one of the public keys and the private has never been exposed to an online connected PC
When you want to send them back to the exchange you can use the Neon Wallet by the City of Zion which at present seems to be the best and scan in via your webcam and zbarcam.
Personally I use my Android phone and kde-connect
Step THREE Recovery to exchange
On your internet connected ubuntu install zbarcam
sudo apt-get install zbar-tools libzbar0 libzbar-dev

sudo apt-get install python-dev

sudo pip install zbar
Application usage:
user@yourpc:~$ zbarcam
zbarcam will then pick up your web cam and scan a QR code which you can paste into Neo/Neon Wallet.
So now the exposure is only in your clipboard.
You can then collect your gas and immediately send Neo to your exchange. ASAP.
At this point you should just about outwit a keylogger/trojan scanning your clipboard on a linux based machine.
But this security situation for Neo will not be resolved until the NEO-CLI is changed a little from what I can understand to provide some off/on-line transaction creation and signing
NEO tipping address: AR2XDEk1Q8XCXEGaHufoCYYBqTk6ZEvVXe
Secure methodology for creating Neo public and private keys Part 1 of 2
Summary
The beauty of this process is that all those private keys you generated for the Neo Paper Wallet public key generator by snowypowers via bitcoin private keys.
These can be regenerated with just the 12 or 13 words from the bitcoin Electrum wallet which YOU can generate with dice rolls.
It creates a simple generation and management of Neo Private keys and no disclosure of the private key until you want to transfer NEO back to an exchange.
Introduction
I’m on Linux which is good but I did get hacked via Teamviewer once and actually saw the person on my PC. I had recycled a password in the dim and distant past from the linkedin hack…
What saved me even if I hadn’t been in the office was 2FA on all my accounts… Live and learn fast!
However as far as I know the official Neo Web Wallet @ https://neowallet.cn/ allows you to send without re-entering your password like say electron. This is a real over sight.
Now I’ve gone over to the Neon City of Zion wallet and use kde-connect to securely pass my private key I scan as a paper QR code on my phone to pc clipboard, which I then paste into the Neon City of Zion wallet.
What would be cool for both wallets is allow you to enter either a 12 word passphrase which you could generate in electrum for example OR your private key.
You can for example user electrum to generate your 12 word passphrase and use one of the private keys generated from your addresses as a Neo/Neon private key.
Part One Installation bitcoin Electrum
On the “official installation page”
https://electrum.org/#download
Replace
sudo apt-get install python-qt4 python-pip
WITH
sudo apt-get install python-qt4 python-pip python-setuptools
I have contacted the maintainers of this page and got nowhere, so I have no idea how the average Joe succeeds in installing it at the moment.
Step TWO Generate your passphrase
Follow the instructions below or just create a new wallet with Electrum which will generate a 12 word passphrase for you
Rolling the dice
http://www.swansontec.com/bitcoin-dice.html Download Dice to Key https://github.com/swansontec/dice2key
wget -O dice2key.zip https://github.com/swansontec/dice2key/archive/master.zip
unzip dice2key.zip
cd dice2key-master
./dice2key.sh 123456123456123456123456123456123456123456123456123
51 dice rolls – the dice2key software will now warn you it’s not 100, but we’re not using it for the actual key, just the entropy, but more than 51 rolls in Electrum v2.4 creates a seed phrase greater than 13 words.
mark@asrock:~/dice2key-master$ ./dice2key.sh 123456123456123456123456123456123456123456123456123
warning: The input has less than 100 dice rolls4. Download Neon Wallet by CoZ
91D89C79009852800BFFCCDC406B1BA0
Next we need the number for Electrum as a decimal not hex, which we can do from the command line:
mark@asrock:~/dice2key-master$ echo "ibase=16; 91D89C79009852800BFFCCDC406B1BA0"|bc
193862769152946304546066490817889639328
Go to the command line, NOT the console within electrum and run
electrum make_seed --entropy=193862769152946304546066490817889639328
It will generate a SEED PHRASE with thirteen words like:
useless welcome frame safe door scrap lock swear frame height hotel endless depth
[Or you can remove a few numbers from the end IE 39328 and get a standard 12 word passphrase
electrum make_seed --entropy=1938627691529463045460664908178896
must student hungry bike parade boring frown sell detail agent tiny matter
Having spoken with Thomas Vögtlin Electrum’s author on IRC, more entropy does not result in a more randomly generated private key:
<m1bxd> Hullo anyone, electrum make_seed –entropy=XXXXXXX can generate a seed of MORE than 13 words, will this cause a problem in the future? or does it not matter – Cheers
<ThomasV> m1bxd: notes
Then you can run electrum
-> File
-> New/Restore
-> Give the wallet a name 2017-08-19 NEO1
-> Standard Wallet
-> “I already have seed”
-> Enter
must student hungry bike parade boring frown sell detail agent tiny matter
-> Next
Go to “View”->”addresses”
-> choose a bitcoin public key
-> Right click
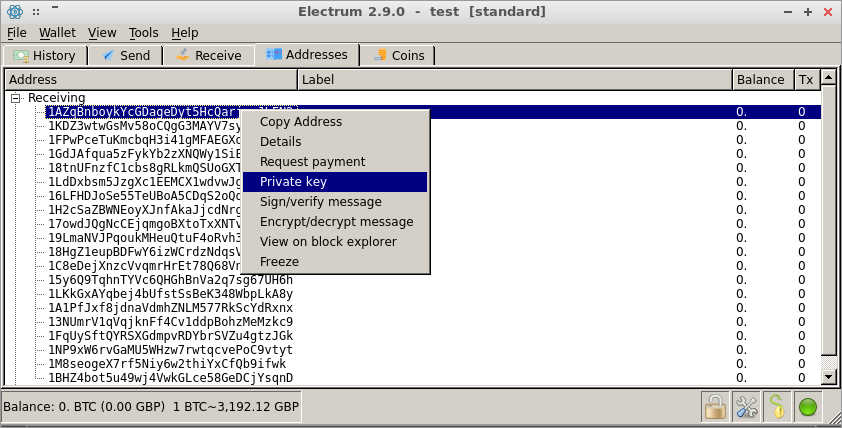
Pick a key pair and use the private key as you Neo / Neon private key.

Now do a couple of things click on the QR link above close
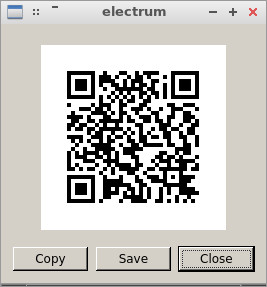
Go to go Copy – go into LibreOffice Writer paste it into a new document
Then go back and copy the private key IE
KyLYqo1KUkMEtf1AFmYF4KiZsqCuyEE56PYwMBYHeQQZRiG2kGqH
Next head over to https://github.com/CityOfZion/neon-wallet/releases
And grab you Neon wallet, if you are on Linux/Ubuntu don’t forget to make the
Linux.Neon-X.X.X-x86_64.AppImage – EXECUTABLE
And paste in the private key we derived from the bitcoin key pair because we can use this in Neon Wallet by CoZ or the official wallets.
We can use this to optionally double check
Now the Neon CoZ wallet has generated the NEO public key
AQJeK26eC1CjMfMdq8ze5YU9Xe8mJriXfS
From the bitcoin private key which you now regenerate from the 12 word passphrase electrum. In fact off the bat you could have generated 20 NEO private keys.
Paste this public key on your LibreOffice Writer page. As well as the NEO public key, print it a few times along with the public key & private key QR codes and12/13 word electrum passphrase.
At the end DO NOT SAVE this page. Only print it ou.
Complete Offline public key/private key generation – head off to part 2
http://mx.thirdvisit.co.uk/2017/08/19/creating-neo-public-and-private-keys-offline-part-2-of-2/
NEO tipping address: AR2XDEk1Q8XCXEGaHufoCYYBqTk6ZEvVXe
Samsung Xpress M2022W aka M2020 Series – How to get a Wireless Connection
This process is express as the product title may lead you to think
Many have struggled with it
Here was my attack
- Connect the printer to a power plug, and add it some paper
- Turn it on
- Then press and hold the “WPS” button for 10 seconds (count in your head) and release
- It should print 2 pages, the second one is them is the “Network Configuration” page
- Near the bottom of the page, is the “Network Key” PIN Number (8 digits) which is for making a With your laptop, CONNECT TO THE WRETCHED SAMSUNG via it’s built in wireless network
- Which should look like say “DIRECT PGM-2020 Series” and use the “Network Key“
- Find out your network IP (either in the terminal with ifconfig (Linux) or ipconfig if on Windows)
- Go to Terminal on linux or type “cmd” in search on windows
- Open your browser and enter the IP address of your PC
- Something called “SyncThru Web Service” will show up.
- In the top right is a “Login” link. Click it, and enter “admin” for ID, and “sec00000” for password.
- You will now see a new option “Settings”. Open Settings -> Network Settings
- On the left select “Wi-Fi”, then select “Easy Wi-Fi Settings”, and follow the wizard to connect the printer to your wireless network
- After that, the printer should restart and connect to your wireless network
Follow the other details on this thread if you are on Linux etc
https://ubuntuforums.org/showthread.php?t=2263245
Homage to lenooh but he missed a few little details out for the unwary
Make a note of you ipp URL, this is under network settings “RAW TCP/IP, LPR, IPP”
ipp://10.64.64.102/ipp/print
SEC30CDA79A1B89
Next in your router, link the IP that your router has given the printer to a fix IP in the DHCP to the MAC address of the WRETCHED SAMSUNG printer.
The MAC address is at the top of the “Network Configuration” page you printed out at the start of this tit ***k.
Install your Google Cloud Print on your Ubuntu Distro
Ubuntu 12.04+ , Kubuntu 12.04+ , Xubuntu 12.04+ , Mint 13+ etc – PPA Based Installation
Run in a terminal:
sudo add-apt-repository ppa:simon-cadman/niftyrepo
sudo apt-get update
sudo apt-get install cupscloudprint
sudo /usr/share/cloudprint-cups/setupcloudprint.py
Unbelievably AWESOME
kde-connect and IPtables save
mark@lucy:~$ sudo ufw allow 1714:1764/udp
[sudo] password for mark:
Rule added
Rule added (v6)
mark@lucy:~$ sudo ufw allow 1714:1764/tcp
Rule added
Rule added (v6)
mark@lucy:~$ sudo ufw reload
Firewall reloaded
mark@lucy:~$ sudo iptables -S
Also see https://technetset.com/install-kde-connect-1-0-kubuntu-16-04/
indicator-kdeconnect for 16.04 general Ubuntu releases, not KDE
September 16th, 2016 at 20:37 | #9
If it is just notifications you want then install an older version of kdeconnect along with indicator-kdeconnect and it works fine to share notifications between devices, share a clipboard, send files between devices and usesthe phone as a keyboard/mouse – plus browse device if it on kittkat or lower (doesn’t seem to work for android 5 or 6.
https://code.launchpad.net/~vikoadi/+archive/ubuntu/ppa/ has up to version 0.8, along with the indicator required for unity/gnome/pantheon/anything else not kde.
http://www.cnx-software.com/2016/09/15/receive-android-sms-call-notifications-in-ubuntu-16-04-with-kde-connect-or-not/sudo apt-key adv –keyserver keyserver.ubuntu.com –recv-keys D05009CB
kde-connect v1 now part of kubuntu
###
kde-connect on Linux Mint 18 xfce - 16th Sept 2016

sudo apt-get install kdeconnect-plasma -y
sudo add-apt-repository ppa:lutostag/indicator-kdeconnect-test [lxle, hmmm]
or
sudo add-apt-repository ppa:vikoadi/ppa        [Official v1 ppa]
sudo apt-get update
sudo apt-get install indicator-kdeconnect -y

[lxle trying to get notifications on PC end to work]
@bam80 yeah unfortunately it is still a bit finicky.
The only way I get it to work currently is to run:
kcmshell5 kcm_kdeconnect
# make sure it it connected to your device,
then only after that...

indicator-kdeconnect
#works for me and shows up in the system tray.

https://github.com/vikoadi/indicator-kdeconnect/issues/31

Added KDEConnect daemon in start up
Added indicator-kdeconnect in start up
https://forums.linuxmint.com/viewtopic.php?t=224013#p1205714

https://ubuntu-mate.community/t/kde-connect-indicator/634
-> Connect Indicator, you can now use KDE Connect in desktops which support
 Ubuntu AppIndicators, such as Unity, Pantheon (elementary OS), Xfce
(Xubuntu) and so on.
http://www.makeuseof.com/tag/kde-connect-sync-android-linux/
https://code.launchpad.net/~vikoadi/+archive/ubuntu/ppa/
#########
14.04 – lxle install
sudo add-apt-repository ppa:vikoadi/ppa
sudo apt-get update ; sudo apt-get install indicator-kdeconnect -y
#########
ADD to LXsession configuration in AUTOSTARTUP!!!!
sudo iptables -A INPUT -i eth0 -m iprange --src-range 192.168.0.1-192.168.0.254  -p tcp --match multiport --dports 1714:1764 -j ACCEPT

sudo iptables -A INPUT -i eth0 -m iprange --src-range  192.168.1.1-192.168.1.254 -p udp --match multiport --dports 1714:1764 -j ACCEPT

sudo iptables -A INPUT -i eth0 -m iprange --src-range  10.64.64.64-10.64.64.254 -p udp --match multiport --dports 1714:1764 -j ACCEPT
####
List Rules by Specification
To list out all of the active iptables rules by specification, run the iptables command with the -S option:
sudo iptables -S
sudo iptables-save > iptables-export_base
sudo iptables-restore < iptables-export_base
sudo apt-get install iptables-persistent -y
During the installation, you will asked if you want to save your current firewall rules. Response yes, if you want to save the current rule set.
If you update your firewall rules in the future, and want to save the changes, run this command:
sudo invoke-rc.d iptables-persistent save
Swaping lines in VIM
~/.vim/plugin/swap_lines.vim
CTRL-J
CTRL-K
source: http://stackoverflow.com/questions/741814/move-entire-line-up-and-down-in-vim
function! s:swap_lines(n1, n2)
    let line1 = getline(a:n1)
    let line2 = getline(a:n2)
    call setline(a:n1, line2)
    call setline(a:n2, line1)
endfunction

function! s:swap_up()
    let n = line('.')
    if n == 1
        return
    endif

    call s:swap_lines(n, n - 1)
    exec n - 1
endfunction

function! s:swap_down()
    let n = line('.')
    if n == line('$')
        return
    endif

    call s:swap_lines(n, n + 1)
    exec n + 1
endfunction

noremap <silent> <c-j> :call <SID>swap_up()<CR>
noremap <silent> <c-k> :call <SID>swap_down()<CR>
How to grep a log file by date with double space CHECKTODAY=$(date +”%b %e”)
You are grep ping a log file and you NEED to keep the padding in a date field.
Mystery / Misery – take your pick, until I found this page
Problem
Log file looks like this
Jul 2 10:14:28 ns380346 postfix/smtp[2179]: 00F54FFAE7: to=<mark@
Note the double space between Jul & 2, you get the padded space with %e, but where is it??
CHECKTODAY=$(date +"%b %e")
$CHECKTODAY
~# echo $CHECKTODAY
Jul 2
~# echo "$CHECKTODAY"
Jul  2
Simples?
How to twitter large summary card
- Find a plug-in, I used Facebook Open Graph, Google+ and Twitter Card Tags
- Read https://dev.twitter.com/cards/overview
- Use validator – must do, as it adds the domain to whitelist
YOU MUST USE THE VALIDATOR!!
This web page: http://mx.thirdvisit.co.uk/2016/05/04/totnes-hydro-weir/
Was then twittered with the proceeding text then just the link! And image gets added automatically! Which if someone then click on, takes them automatically to the web page

My notes to getting plug-ins working under Ubuntu with KeePass (OtpKeyProv)
This method does not work with KeePassX, plugins only work with KeePass2/?1 with mono underneath
http://maxolasersquad.blogspot.co.uk/2013/10/install-keepasshttp-on-ubuntu.html
cd /usr/lib/keepass2/
sudo mkdir plugins
cd plugins
https://sourceforge.net/p/keepass/discussion/329221/thread/d6f5b5b5/
you don’t need mono-complete
you only need a fitting compiler which is in the mono-dmcs package in ubuntu oneiric or newer and mono-gmcs in natty or older
sudo apt-get install mono-dmcs
https://launchpad.net/~jtaylor/+archive/ubuntu/keepass
sudo add-apt-repository ppa:jtaylor/keepass
sudo vi /etc/apt/sources.list.d/keepass2.list
then ADD for example:
**deb http://ppa.launchpad.net/jtaylor/keepass/ubuntu utopic main **
**deb-src http://ppa.launchpad.net/jtaylor/keepass/ubuntu utopic main**
My goal was to get OtpKeyProv 2FA working
cryptocurrency round-up
- We have Bitcoin scalability debates (not issues)
- Dashcoin, pretend to the throne with some scalability issues
- Bitcoin-NG
- Then the joker in the pack Blackcoin because it has community and Halo/NightTrader linked to it
Will Zcash really start to irritate the authorities?
Internet passthrough on Ubuntu | HTC Desire S | XDA Forums xda-developers.com
Internet passthrough on Ubuntu | HTC Desire S | XDA Forums xda-developers.com
……..I hope this solves your problem.
Edit /etc/rc.local sudo nano /etc/rc.local and add the following:
echo 1 | sudo tee /proc/sys/net/ipv4/ip_forward > /dev/null
iptables -P FORWARD ACCEPT
iptables -A POSTROUTING -t nat -j MASQUERADE -s 192.168.99.0/24
iptables -A FORWARD -i eth0 -o usb0 -m state –state RELATED,ESTABLISHED -j ACCEPT
iptables -A FORWARD -i usb0 -o eth0 -j ACCEPT
#forward all dns queries from usb0 to google’s dns server
iptables -t nat -I PREROUTING -i usb0 -p udp –dport 53 -j DNAT –to 8.8.8.8
then at terminal type:
sudo /etc/rc.local
that will get you connectivity, but it will be short lived because htc is stupid and will disconnect if it doesn’t detect the winblows htc software crap.
So you will need to fake it out. Turns out the phone is listening for htc software on port 6000 for 00 02 00 00 hex.
first you have to find the ip address of your phone (if arp doesn’t work or you get command not found, you probably need to sudo arp):
phoneip=$(arp -n | grep usb0 | awk ‘BEGIN {FS=” “} {print $1}’)
then you tell the phone that htc software is listening:
echo -n -e “\x00\x02\x00\x00” | nc $phoneip 6000 > /dev/null
To make that automagic each time us a script. Call it htcfaker or whatever:
#!/bin/bash
while :; do
phoneip=$(arp -n | grep usb0 | awk ‘BEGIN {FS=” “} {print $1}’)
while [ -z $phoneip ]; do
sleep 15
phoneip=$(arp -n | grep usb0 | awk ‘BEGIN {FS=” “} {print $1}’)
done
echo -n -e “\x00\x02\x00\x00” | nc $phoneip 6000 > /dev/null
while [ “$phoneip” != “” ]; do
sleep 15
phoneip=$(arp -n | grep usb0 | awk ‘BEGIN {FS=” “} {print $1}’)
done
done
Then in your startup applications, point to that script.
Hope it helps!
Last edited by haz3lnut; 22nd July 2012 at 07:36 PM. Reason: may need to sudo arp
#COPIED HERE INCASE xda-developers.com ever disappears without trace. Please call +447855129142 if this repost breaks copyright etc.
eBTC – distributed email you pay for with BTC
The eBTC Wallet is written is as a wrapper for GPG
The Wallet is also a basic deterministic BTC wallet
Your GPG key isn’t important as you can update that against a supernode at anytime. You just have to write down your pass phrase
Wallet scans GPG public key hash on supernode network, if mail present – pull from supernode which has holds it, decrypt and write “message read to eBTC blockchain” – keep local copy for when it’s deleted from the supernode(s)
Wallet provides sending interface, you submit email paying for how long it’s held on a supernode in seconds, define delete on read or delete on read X times, hold on other Supernodes
When the user sends an eBTC email – the user receives a standard internet email
You can view what emails you have sent and delete them from the supernodes you choose for each email, you may have picked a different supernode for a particular service offering
The wallet is the user node, it communicates with a supernode and you can choose which supernode at what prices
Deletion email from eBTC, you can choose to delete from the supernodes it’s held on, if more than one was choosen at sending time
The supernode stores public keys for email addresses, but only stores the email address as a hash
A sender must make a public key request knowing the email address in order to be able to create a hash for the supernode to return the search
In order to submit your GPG public key and bitcoin public key you submit signed token to your supernodes
Supernodes are, on all the time
Supernodes are SMTP servers which store GPG emails from eBTC wallet clients – but don’t forward
Senders have a micropayment channel setup with a supernode for sending GPG emails via their wallet and vica versa for receiving email
The eBTC blockchain contains two sets of data:
– “hash of GPG public key user | messageID | SupernodeID (held on)”
– “hash of GPG public key user ‘read’ | messageID | at UTC | on SupernodeID” (supernodes only hold ONE copy of the email for multiple recipients)
Supernodes use some environmentally friendly CPU only algo and number eBTC you have generated puts you on the leader board within the wallet app to advertise your prices
The eBTC wallet bootstraps supernodes with in the reference client and the allows supernodes to effectively advertise their brand
Supernodes can exchange eBTC and thuse to position their brand within the reference client
Supernodes send “read” confirmations to standard email addresses
Supernodes code can prune away to keep the lid on blockchain sizes, automatically remove blockchain data if emails read by all recipients redundant
Imagine eBTC is like sunshine, it can be used are laid down like coal or oil but the raw energy of creation is for all intents and purposes unlimited
Installing VirtualBox Additions under LXLE v14.04.3 64 bit
VirtualBox Additions under LXLE v14.04.3 64 bit
sudo apt-get install dkms build-essential linux-headers-generic linux-headers-$(uname -r) virtualbox-guest-x11
cd /media/mark/VBOXADDITIONS_5.0.10_104061
./VBoxLinuxAdditions.run
sudo /etc/init.d/vboxadd setup
Shared folders under VirtualBox
sudo adduser [username] vboxsf
– THEN restart the VirtualBox!
Thanks to:
https://forums.virtualbox.org/viewtopic.php?t=15679
http://askubuntu.com/questions/642991/virtualbox-ubuntu-14-04-vboxclient-the-virtualbox-kernel-service-is-not-runnin
http://www.howtogeek.com/187703/how-to-access-folders-on-your-host-machine-from-an-ubuntu-virtual-machine-in-virtualbox/
Windows 10 tools
ProduKey by Nirsoft – Windows Key and other software Key recovery
Microsoft Media Creation Tool – ISO to USB or DVD
How to: bitcoin cold wallet storage using random dice entropy to generate a deterministic seed phrase
PART A
1.
Next we need to install Electrum – this is for the offline machine were building
https://electrum.org/#download – keeping a copy, so we know exactly what was used to create the wallet
sudo apt-get install python-qt4 python-pip
sudo pip install https://download.electrum.org/Electrum-2.4.tar.gz
wget https://download.electrum.org/Electrum-X.Y.tar.gz
Substitute the X.Y for what is current, as above at the time of writing.
2.
http://www.swansontec.com/bitcoin-dice.html
Download Dice to Key
https://github.com/swansontec/dice2key
wget -O dice2key.zip https://github.com/swansontec/dice2key/archive/master.zip
unzip dice2key.zip
3.
Now do whatever you have to do to get the printer working &
4.
zbar (this is a python library that allows you scan QR codes) This can be quite hard to out and some people have suggested just using an online service to do this, IDIOTS ignore them. You need an offline signing machine to make this setup secure, now having both PC’s that can scan QR codes is very useful.
sudo apt-get install zbar-tools
sudo apt-get install libzbar0 libzbar-dev
sudo apt-get install python-dev
sudo pip install zbar
Application usage:
user@yourpc:~$ zbarcam
5.
Disconnect this PC from the Internet – you may choose not to reconnect it for some time if ever or just rebuild the off-line PC from the seed passphrase or USB key with the private keys on it
PART B
1.
Lets generate random numbers
See this link as for single private key generation requirements https://www.reddit.com/r/Bitcoin/comments/2akdl5/howto_use_your_own_dice_rolls_to_generate_an/
2. Terminal to the directory you unzipped dice2key
./dice2key.sh 123456123456123456123456123456123456123456123456123
51 dice rolls – the dice2key software will now warn you it’s not 100, but we’re not using it for the actual key, just the entropy, but more than 51 rolls in Electrum v2.4 creates a seed phrase greater than 13 words.USB Stick#1
<m1bxd> Hullo anyone, electrum make_seed –entropy=XXXXXXX can generate a seed of MORE than 13 words, will this cause a problem in the future? or does it not matter – Cheers
<ThomasV> m1bxd: no
And it does this regardless of what you set –nbits too, so I’ll leave it up to you how many dice rolls you do… One person on IRC #electrum thought this was a bug and implied that the seed phrase length should be determined by “–nbits” – I think this is a bug too. But not a dangerous one as stated by Thomas, please consult the IRC snippet above. Who I assume was/is Thomas Vögtlin.
The output of the dice is now in HEX from dice2key
91D89C79009852800BFFCCDC406B1BA0
Can you do more dice rolls which will result in more words for a longer seed phrase?
Yes according to Electrum lead developer you can increase the entropy at the make_seed stage
And let’s think about the formula ere http://electrum.orain.org/wiki/Electrum_seed_phrases#checksum_and_version_number
normalized_seedphrase = mnemonic.prepare_seed(seed_phrase)s = hmac_sha_512("Seed version", normalized_seedphrase)
So I cannot see a reason for not doing more dice rolls and creating more entropy for Electrum?
3.
Next we need the number for Electrum as a decimal, which we can do from the command line:
echo "ibase=16; 91D89C79009852800BFFCCDC406B1BA0"|bc
We should get something like this
193862769152946304546066490817889639328
4.
Go to the command line, NOT the console within electrum and run
electrum make_seed --entropy=193862769152946304546066490817889639328
It will generate a SEED PHRASE with thirteen words like:
useless welcome frame safe door scrap lock swear frame height hotel endless depth
5.
Print this out several times
6.
Save it to a text file on a USB or two and save the file as “SEED PHRASE.TXT” on a USB stick called ALLKEYS, to be on the safe side DO NOT save this text file to the PC, as you may in the future accidentally connect it to the Internet and it could become compromised. You may choose not to give a password for the wallet, if you choose not to, immediately disable the machines networking ability at this stage.
7.
Use this seed phrase on the offline Electrum machine to create a new wallet – give the wallet a useful name and consider using a simple password. See previous step as to why.
8.
Copy the public keys from this Electrum wallet you want to deposit to on a new USB, label it PUBLIC KEYS
and save this file as bitcoin_address_public_keys.txt – you can grab these address from the terminal screen if you executed “electrum” from the shell.
9.
Export both bitcoin public addresses and bitcoin private keys to the USB labelled ALLKEYS
Wallet -> Private Keys -> Export
“File” bottom LHS navigate to your ALLKEYS USB stick “electrum_private_keys_john.csv” -> “Export”
If you open up this file there will be a column of private keys next to your public bitcoin addresses. These are “WIF Compressed Private Keys”, 52 characters base58, starting with a ‘K’ or ‘L’.
For example:
KyPiXS1uPGo1yRnu4tXhz72qLzmYsAKhrnBQBdzKHT6xPYjXb5Hr
Print them out along with your seed phrase and seed phrase QR code.
Why print/save these “WIF Compressed Private Keys”? They allow you to recover your bitcoin without Electrum in the future, should you loose pretty everything in this tutorial. You can redeem and “sweep” / import them in the future to probably any other bitcoin wallet. Thus if you transfer bitcoins to the public bitcoin addresses to which you have an offline copy of this private key on the ALL KEYS USB or paper / QR code. If like me, you like paper and would regard it as more stable than taking another USB copy – you’ll be wasting a bit of paper doing some duplicates. Also take a laser process photocopy of these so that you’ve used another process which will by it’s nature have different image stability, especially if you did the original print outs on ink jet with low grade ink and paper.
Do not save this file to the computer if you have chosen to password protected your wallet, it renders the password process useless if you do. If you are never going to connect this PC to the internet again – it doesn’t matter about the password on an Electrum wallet and can due to human fragile memory be more of a hinderance than a help.
Also copy your wallet folder at /home/$USER/.electrum/wallets to this ALLKEYS USB stick
10.
Study this page and follow the instructions at https://electrum.orain.org/wiki/Cold_storage
Export the public master key from the Electrum machine to the PUBLIC KEYS USB stick, it will start
xpub661XXXXXXXXXXXXXXXXXXXXXXXXXXXXXXXXXXXXXXXXXXXXXXXXXXXXX
Save it in a separate file from the bitcoin address PUBLIC KEYS. Say for example call it public_master_key.txt
11.
Install Electrum on a standard Internet connected PC and create a new wallet using the instructions above, this is called a watching wallet.
It will contain the bitcoin public addresses, it can observe the transactions against them, but the wallet cannot sign any transaction on the wallet and therefore if this machine is compromised in anyway you cannot loose any bitcoin.
Only the offline machine can sign the bitcoin transactions. You then take the signed transaction generated on the offline machine, typically moving bitcoin from one address to another address.
Copy the transaction to a blank USB or other means like printed QR codes and webcams, to create an off-gapped setup.
Or use a mobile phone as a dumb intermediary to scan and display the transaction to the watching wallet / transaction broadcasting machine.
USB Stick#1
You can move this to the Internet connected PC – the watching wallet
PUBLIC KEYS
public bitcoin addresses for transferring coins to cold storage – start 18PNEanH83XXXXXXXXXXXXXXXXXXXXXX
public master key – start xpub661XXXXXXXXX
USB Stick #2, #3 & #4
Never connect this to an Internet connected PC
ALLKEYS
SEED PHRASE.TXT
public bitcoin addresses for receiving and the private keys associated with each address
PART C
So you’ve transferred some bitcoin to one of your public bitcoin addresses on the offline cold storage, which you can also see with the watcher wallet on the Electrum installation that is internet connected but how do we spend them again?
1.
Go to the watcher wallet, go to Send, nominate your amount to transfer then you will need to sign the transaction that has just been generated on the the signed by the offline setup.
2.
Export the transaction to be signed.
The easiest way to do this is to scan the barcode with your mobile or print out the transaction.
3.
Import transaction at the offline machine.
Go to Tools -> Load transaction -> From QR code
4.
Sign it after scanning or however you choose to import it.
5.
Turn the signed transaction back into a QR code.
Scan it with your phone or print it out.
6.
Return to your watcher wallet which is online
Go to Tools -> Load transaction -> From QR code
Select “Broadcast”
7. (There should always be a seven)
That’s it job down. However if you wish to keep your bitcoin quantum computer secure, you should always transfer the whole of the amount of each bitcoin deposited on any singular address which have kept in a cold wallet when you move them to a new unused bitcoin address.
For example if you have 5 btc on one address in your cold wallet, if you want to 1btc to more accessible wallet you should do two bitcoin sends.
You should send 1 btc to your easy wallet and you should send 4 btc to an unused address on the cold wallet.
2015 May top Bitcoin sites and ‘happenings
Shocard
http://techcrunch.com/2015/05/05/shocard-is-a-digital-identity-card-on-the-blockchain/
21E6
http://www.cryptocurrencybuzz.com/21-inc-confirms-plans-for-mass-bitcoin-miner-distribution/
https://soundcloud.com/elux-1/21-inc-embedded-engineer-on-whaleclub-teamspeak
Streamium.io
http://mx.thirdvisit.co.uk/2015/05/25/streaming-recorded-video-via-streamium-io/
ZeroNet
Slideshow about ZeroNet cryptography, site updates, multi-user sites
Bitcoin Lightning Network
http://www.reddit.com/r/Bitcoin/comments/2xcq4x/instant_bitcoin_transactions_proposal_lightning/
http://www.coindesk.com/could-the-bitcoin-lightning-network-solve-blockchain-scalability/
Streaming recorded video via streamium.io
I cannot get webcamstudio to work Ubuntu 14.whatever 64bit standard LTS
sudo add-apt-repository ppa:webcamstudio/webcamstudio-dailybuilds
sudo apt-get update
sudo apt-get install webcamstudio
sudo chmod 666 /dev/video* if you are on ubuntu, did you install webcamstudio.dkms package also?
sudo apt-get install webcamstudio.dkms
Once installed you have to restart the system or type from terminal:
sudo modprobe webcamstudio
Auto Install v4l2loopback
First from a terminal, drop to a root shell
sudo su
If you havent installed kernel modules before with module-assistant run the following from a terminal
apt-get install module-assistant
m-a prepare
m-a update
Finally – download and install v4l2loopback
m-a a-i v4l2loopback
exit
Cracked it! (You’ve got to get the “Output” to look like my screenshot below)
- Tick V4lsloopback
- Tick Skycam
- Root prompt comes up
- (WS Audio Device?)
- WSVideo Device (0X0001)(1)

Now run FireFox, Chrome doesn’t want to pick up the Virtual Webcam under Chrome on Ubuntu 64bit

Now spot the shitter – FireFox choose camera see the Virtual Device as WSVideoDevice(0x0000), this afternoon it had to be “Dummy Virtual Device(0x0000)” – which Virtual WebCam you nominate seems to be random compared to what you think WebCamStudio will be outputting…
Please don’t ask me about sound – I’ll assume it comes through. IE I couldn’t be bothered to test it, but thought these notes so far might help people out.
E&OE PLEASE twit me with any amends and tips @markcross
### CUT ###
Old school method which I got working after I initially gave up with webcamstudio
http://askubuntu.com/questions/54032/compiling-avld-on-11-04/54055#54055
Missing H.264 decoder
sudo apt-get install gstreamer1.0-libav gstreamer0.10-ffmpeg
http://askubuntu.com/questions/139239/fake-a-webcam-using-a-video-loopback-device
gst-launch-0.10 filesrc location=xxxxxx.mp4 ! decodebin ! v4l2sink device=/dev/video1
Find this article useful, here is my bitcoin address if it saved you going MAD or have a go with the changetip icons
bitcoin: 1FnkZ6EZBSSVuo7Y2JDNBBNuS5MahmWpPe

Other credits
http://superuser.com/questions/411897/using-desktop-as-fake-webcam-on-linux
https://launchpad.net/~webcamstudio/+archive/ubuntu/webcamstudio-dailybuilds
http://askubuntu.com/questions/54032/compiling-avld-on-11-04/54055#54055
Optimizing Ubuntu 14.04 for SSD usage or how not to abuse
On revamping a netbook from the grave, in fact just the only thing working about it is the motherboard! I decided to swap out the SSD in my Dell Studio 1737 which was in the second drive bay as my Ubuntu boot up.
So on ebay I found a Kingston S200 30GB SSD drive for £30 GBP. But for some reason instead of just popping it in, preparing a USB with Ubuntu and getting on with it I decided to do a bit of reading. To my horror I discovered I’ve been guilty of ssd abuse… For quite some time.
Read all the four source pages before attempting anything.
- Create your swap partition on a conventional hard drive
- Consider /var/log partition on a conventional hard drive
- Consider /tmp partition on a conventional hard drive
- Leave 7% of your EXT4 main Ubuntu partition unallocated at the end
- With “noatime” in /etc/fstab, you disable the write action “access tim//e stamp”
An adapted line may look like this:
UUID=cf741928-1eb0-4253-91c6-cea28105dbef / ext4 noatime,errors=remount-ro 0 1
The cleaning action TRIM is necessary for the good performance of your SSD in the long run. Otherwise it’ll become very slow after some time.
/etc/rc.local
#!/bin/sh -e
#
# rc.local
#
# This script is executed at the end of each multiuser runlevel.
# Make sure that the script will “exit 0” on success or any other
# value on error.
#
# In order to enable or disable this script just change the execution
# bits.
#
# By default this script does nothing.
fstrim -v /
exit 0
- Disable the superfluous weekly cron job for TRIM
- sudo mv -v /etc/cron.weekly/fstrim /fstrim
Sources:
http://askubuntu.com/questions/1400/how-do-i-optimize-the-os-for-ssds
https://sites.google.com/site/easylinuxtipsproject/ssd#TOC-During-installation:-select-EXT4
Create a RAM disk to optimise Chrome and FireFox
Chrome
sudo mkdir -p /media/ramdisk
sudo vi /etc/fstab
tmpfs /media/ramdisk tmpfs rw,size=512M 0 0
double check chrome cache location:
ls -ls ~/.cache/google-chrome
rm -rf ~/.cache/google-chrome
ln -s /media/ramdisk/ ~/.cache/google-chrome
Firefox
type
about:config
in address bar create
browser.cache.disk.parent_directory
By right-clicking over the variables list
Right-click somewhere in the list and select “New > String”
For the name of the preference type or copy’n paste: browser.cache.disk.parent_directory
Enter the string value
/media/ramdisk/
Next locate the preference browser.cache.disk.enable, it must be set to true, if it is not, double-click on it to change its value
By default firefox stores cache in cacheme whereas chrome in Cache folder.
Restart firefox, you’ll find new folder in /media/ramdisk/
Note: for caching to work make sure browser.cache.disk.capacity is set to true
Sources:
http://askubuntu.com/questions/152868/how-do-i-make-a-ram-disk
http://www.linuxreaders.com/2011/01/firefox-chrome-cache-on-ram-drive-fedora-ubuntu.html
Maybe Cameron isn’t an idiot? But a closet property developer #CameronCryptoBollox
Well our Prime Minister David Cameron really set the tongues wagging for the 1% with a vague concern about the small issues surrounding the freedom of speech on Monday 12th January 2015. The alleged “I am clearly an idiot with mentally challenged advisers” was as follows:
“Are we going to allow a means of communication between people which even in extremis, with a signed warrant from the Home Secretary personally, that we cannot read?â€
“No we must not. The first duty of any government is to keep our country and our people safe.â€
You see, I live near to Totnes in the UK, you may have heard of it even Internationally, it’s the home of Transition Town. Every now and again we’ll get the odd strange planning application come up in the local paper. The Duke of Somerset to build on green belt, yarda yarda. Then there’s the plot at the end of Plymouth road by the Council offices, yarda yarda and again a lovely green field site previously owned by the Dartington Hall Trust. Going under concrete as I type.
So I reckon Cameron is maybe a closet property developer? If you follow a local planning issue in your town and I’m writing as a Brit, I’m sure it’ll be the same story in your own town where ever you live.
- Property Developer wants to build 100 homes
- Property Developer applies to build 500 homes
- Local outrage
- Local authorities grant permission for 150 with stipulation to provide help for local amenities
- Property Developer horse trades and settles for 100 without helping out local authorities
Directive 2006/24/EC-Directive 2002/58/ECÂ
According to the directive, member states will have to store citizens’ telecommunications data for a minimum of 6 months and at most 24 months. Under the directive the police and security agencies will be able to request access to details such as IP address and time of use of every email, phone call and text message sent or received. A permission to access the information will be granted only by a court. On 8 April 2014, the Court of Justice of the European Union declared the Directive invalid in response to a case brought by Digital Rights Ireland against the Irish authorities and others. (Wikip)
Germany’s Merkel urges new EU law on data tracking
15th January
An EU directive on data retention was made invalid by a European Court of Justice (ECJ) ruling last April.
That 2006 directive opened up private communications data to police, but message content was still protected.
Ms Merkel’s statement contrasts with the uproar in Germany last year over US mass surveillance of internet traffic.
She was speaking in the lower house of parliament (Bundestag) about measures to prevent attacks like the killing of 17 people in Paris last week by Islamist gunmen. (BBC)
Have have ever met a poor property developer? Or builder?
So as we know that banning encryption is clearly a stupid planning request, but we can see that providing the requirement for several hundred million or possibly a billion pounds plus of IT expenditure would be of great benefit to the private IT sector. The very same people who are calling Cameron an idiot – I’m not so sure.
Chrome or Chromium and you don’t have the Multiple Profiles on Linux
I copy from Jim in case his site goes – thank you
If you’re using an older version of Chrome or Chromium and you don’t have the Multiple Profiles option, you can use the switch
|
1
|
--user-data-dir |
when opening the browser and the profile for your session will be pulled from the given folder instead of the Default folder. The folder specified should be created automatically. To be safe, I like to create the folder before providing it as an argument.
As explained here, the default directory is located at:
|
1
2
|
Google Chrome: ~/.config/google-chrome/DefaultChromium: ~/.config/chromium/Default |
Open a terminal and create a new directory for your second profile. For instance:
|
1
|
mkdir ~/.config/google-chrome/work |
Then, open Google Chrome with the switch:
|
1
|
google-chrome --user-data-dir='~/.config/google-chrome/work'Â Â & |
chromium-browser –user-data-dir=’/home/mark/.config/chromium/totnes’ &
Android Genius, take incoming call, fire up note taking app automatically
Android Tip: “Actions Lite”, On event Call answered -> Start Application -> “GTasks”.
Notepad Heaven = Immediately start taking notes
windows 7 64 bit fails install 0X80070057
http://support.microsoft.com/kb/2476568Â – EPIC whale fail “many shit” #dogecoin
OR
karlsnooks wrote on:
http://www.sevenforums.com/installation-setup/245167-windows-7-clean-install-error-0x80070057.html
Use your Win 7 DVD to “clean” your hard drive.
GO TO A COMMAND PROMPT
USING YOUR WIN 7 DVD/UFD
- BOOT TO A COMMAND PROMPT USING A WIN 7 DVD/USB STICK
- Insert your Win 7 DVD or Win 7 USB
- Power down your computer
- Power up your computer.
Boot up your computer from the Win 7 DVD/USB stick - When a screen is displayed asking for the Language to Install,
press the key combo of SHIFT + F10 - Do NOT click on Next.
Press the SHIFT + F10 key combo.
You will have a X:\Sources> command prompt.
X: is a ram drive created by Windows 7.
X: contains a mini-version of Windows 7 called a PE (pre-execution environment).
If you do not plan on installing windows at this time, you may now remove the DVD/USB stick.
If you plan on continuing with an install, then do not remove.
Execute the desired commands.
Use the EXIT command to return to the Win 7 installation procedure.
NOTE: UFD = Usb Flash Device = usb stick = pendrive = thumb drive
==================================================
That showed you how to get to a command prompt.
Here is how to prepare the hard disk once you are at the command prompt:
type these commands,following each by hitting the ENTER key:
DISKPART
LIST DISK
SELECT DISK 0
DETAIL DISK (to make sure you got the hard disk)
CLEAN
EXIT
EXIT (this one gets you back into the install program.
—
clean
e. Create a partition.
Type in:
create partition primary
f. Select the partition.
Type in:
select partition 1
g. Activate the partition on the disk.
Type in:
active
h. Do a full format into NTFS.
Type in:
format fs=ntfs
It will take some time to complete. Anywhere from 30 minutes up to several hours, depending on the size of the disk.
thanks again to the person who posted this solution as I was able to format my IDE disk and install windows 7.
#############
Christmas Day – still going on this one!
Sorted use Sardu to create my USB with old Grub v 0.4.4…..
#############
Type In:
DISKPART
LIST DISK and identify your disk number (from 0 to n disks)
SELECT DISK <n> where <n> is the disk number
CLEAN ALL (Will Take Some Time)
CREATE PARTITION PRIMARY ALIGN=1024
FORMAT FS=NTFS (Will Take Some Time)
ASSIGN LETTER=M
ACTIVE
EXIT
EXIT
[ Immediately Terminate Install Process Completely ]
And
Reboot using Installation DVD.
Do NOT reformat during installation process
Tent.io – Cupcake anyone?
Hyper-G, commercially now Hyperware was for a dashing moment the competitor to the web as we know it (University of Graz). It provided a system where you couldn’t get dead web links, still built on http:// but speed to market prevailed.
One to watch http://tent.io – this could be one to watch – FaceBook 🙂 It could certainly replace email in the near future very rapidly.
For medium techies, here’s another person’s take:Â http://web.appstorm.net/general/opinion/why-tent-io-seems-more-promising-than-app-net/
windows 7 could not complete the installation
Weird one, doing a restore from factory Acer disks, after new hard drive replacement
…
Found the solution: The machine’s BIOS has the “SATA Operation” setting in “RAID on” or “AHCI” mode. This setting is good for W7 install and image creation. (And gives the best disk performance if everything is working) But this is not good when restoring the image from the WDS server…
FIX: Put this setting back to ATA in BIOS and do the WDS image load again. Woila, the W7 will mini-install and boot up normaly. After all settings are done, you may download the machine specific AHCI driver and install it. Don’t forget to set back the BIOS setting after you install the AHCI driver BEFORE start the W7 again.